Clone the project repo to follow along…
In the first two parts of our multi-part series on shipping containerized Node.js apps using the AWS Elastic Container Service, we looked at how to Dockerize our app and get it ready to ship by using the Elastic Container Registry. This time we’re going to dive into an essential piece of ECS-specific configuration known as Task Definitions. Like anything new, this may seem daunting at first… but with a little exploration we’ll gain enough knowledge to start feeling comfortable.
Introduction
Task Definitions are JSON documents which act like blueprints for our container instances. They define things such as the role our tasks will use (ensuring they can make requests to required APIs), image details (a pointer to ECR in our case), resource controls (CPU, memory, volumes), health check details, logging configuration and more.
When you first look at examples in the documentation, they can seem overwhelming. The First Run Wizard is a good place to start when learning ECS. However, when walking through the wizard or using an existing definition for reference, if you just copy/paste the Task Definition and try to create a new one from scratch you will often get errors:
Should only contain "family", "containerDefinitions", "volumes", "taskRoleArn", "networkMode", "requiresCompatibilities", "cpu", "memory", "inferenceAccelerators", "executionRoleArn", "pidMode", "ipcMode", "proxyConfiguration", "tags", "placementConstraints"
For more information on all Task Definition parameters, refer to the documentation… but this is actually a friendly error message – at least now we know what parameters are required!
Aside from the web console, you can also generate a starting template using aws ecs register-task-definition --generate-cli-sekelton. This will give you a
starting point similar to the documentation template.
Just be aware that you may not need all of the template items. For example,
the templates present an expanded volumes section, but if your app isn’t using
volumes that will collapse to an empty list.
Starting with a template and working through the parameter documentation is the best way to gain familiarity, but I want to discuss a few things in detail…
First, let’s talk IAM. Your tasks are going to need associated roles that let
them talk to required APIs. One example is reaching out to ECR to download the
image we previously pushed. When walking
through the wizard or creating new services in the web console, a default
ecsTaskExecutionRole will be created for you. This works fine to get started,
but if you plan to run a lot of services and desire more segregation or want to
fine-tune permissions you can create your own custom task execution roles.
These get referenced in two places:
{
  "executionRoleArn": "arn:aws:iam::012345678901:role/ecsTaskExecutionRole",
  "taskRoleArn": "arn:aws:iam::012345678901:role/ecsTaskExecutionRole"
}
The second thing we obviously need is a way to get our image from ECR… Assuming the roles allow the required access, this is done with one line in our container definition:
{
  "containerDefinitions": [
    "image": "012345678901.dkr.ecr.us-east-2.amazonaws.com/hello-world:latest",
  ]
}
Next I want to discuss container health checks.
When I setup my first ECS task, my health checks weren’t working. I went on a
wild goose chase which included refactoring my app’s /healthcheck endpoint (in
the end that resulted in much better application health checking!) and trying to
use amazonlinux instead of Alpine.
The amazonlinux images (which you can pull from ECR or Docker Hub are a fine starting point if you have dependencies on many things from standard Amazon Linux EC2 AMIs. However, they are a lot heavier than Alpine. Here’s a real-world example of a Node.js app + dependencies using Alpine vs Amazon Linux:
012345678901.dkr.ecr.us-east-2.amazonaws.com/app  3f5fd5e1fb2f  145MB
012345678901.dkr.ecr.us-east-2.amazonaws.com/app  75ece8e07700  648MB
After refactoring my app and rebuilding my
container using Amazon Linux, it was still busted… Stepping back a bit, I
realized it was an issue with my container health check. I had copied my
healthcheck.command from the docs. By default that used CMD but I needed
CMD-SHELL. Make sure you understand the difference between these by consulting
the docs!
It also helps to have curl installed in your container image (a default with
amazonlinux, just apk add curl for Alpine).
"healthCheck": {
  "retries": 3,
  "command": ["CMD-SHELL", "curl -f http://localhost:8080/ || exit 1"],
  "timeout": 10,
  "interval": 20,
  "startPeriod": 20
}
In case it saves anyone else confusion… My decision to try going with amazonlinux (despite not needing or wanting the bloat) was a mis-understanding of the documentation around the ECS Container Agent. While absorbing the massive ECS-related material, I initially thought non-amazonlinux container images needed to have the agent added for health checks to work.
In reality, the agent is a host vs container thing. You can bring any container image you want to ECR/ECS and it should work fine… The container agent only becomes a concern if you are hosting your own EC2 instances using the EC2 Launch Type. In our case, we let Amazon manage as much as possible. Using the Fargate Launch Type means we don’t need to worry about the container agent.
Last but certainly not least, let’s talk about logs… As you’re already aware if coming from something like Kubernetes or OpenShift (or living with Twelve-Factor Apps in any shape or form), logs move from luxury to essential status the moment you decide to containerize. The need goes to eleven when you chose a managed blackbox container orchestration platform.
In your ECS Task Definitions, the relevant snippet is logConfiguration – let’s
look at some sensible default options, then talk through details:
"containerDefinitions": [
  {
    "logConfiguration": {
      "logDriver": "awslogs",
      "secretOptions": null,
      "options": {
        "awslogs-create-group": true,
        "awslogs-group": "/ecs/hello-world",
        "awslogs-region": "us-east-1",
        "awslogs-stream-prefix": "hello-world-app"
      }
    }
  }
]
You can get more specifics from the docs, but I want to call out two things here and expound on a third in the next section…
Here we’re using the awslogs driver, which stores stdout and stderr from your
container instances in CloudWatch Logs.
If you just generate a template you will often be missing awslogs-create-group.
That means you will need to log into CloudWatch Logs and create the log group.
If you create the task before doing that, you will get errors about the missing
log group and containers won’t be able to provision. If you want re-useable
configuration you can easily copy/paste or feed into Terraform, ensure you have
awslogs-create-group: true.
Templates will often default awslogs-stream-prefix to something like ecs. I find
prefixing the log group with /ecs/ suitable for that, and set the stream prefix
to the app / container instance name. This makes searching for specific logs
within CloudWatch a lot easier. Otherwise you’ll be left hunting down and
searching via container instance ID. In our sample use case this isn’t a big
deal, but for more complicated apps it can speedup troubleshooting.
A Note on IAM
In examples above, we just use the ecsTaskExecutionRole since it is a default
created by the ECS wizard. That is fine to use for learning and experimentation,
but for more important things you will want to define per-service roles. This is
worth doing for at least a couple reasons…
First, you’ll have to do it anyway to get CloudWatch Logs fully functional. In
order for awslogs-create-group: true suggested above to work, you need the
logs:CreateLogGroup permission. The default AmazonECSTaskExecutionRolePolicy
only allows creating new streams within an existing group.
More importantly, you typically need to wire tasks up to Secrets Manager or Parameter Store. That means more IAM permissions. If you are running multiple services in a single account, you’ll want to restrict each service to specific prefixes so a single compromised service can’t side-channel into your entire portfolio. The project repo gives an example of a reasonable policy template.
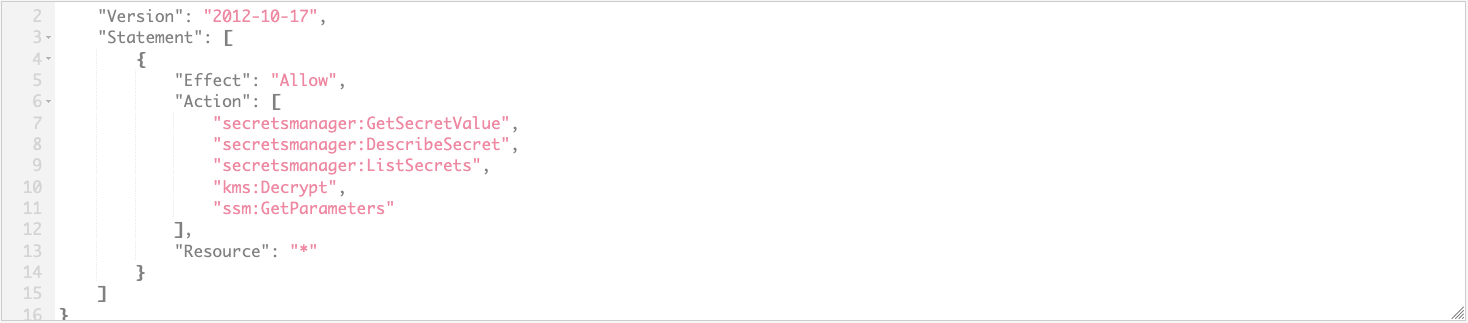
Here’s an example of attaching managed policies to make the default role more
useful (I like to keep my custom policies very granular to be re-used like
legos). In this case we just grant access to any parameters or secrets in the
same account using default or custom keys (kms:Decrypt is technically only
required if using custom KMS keys for encryption, but good future proofing).
This is better than a simple Resource: "*", but the sample policy linked above
goes further – just think about your use case, and how much access you are
granting! This also shows granting access to both Parameter Store and Secrets
Manager – you probably only need one:


Use managed policies to extend default accessPolicies granting access to parameters, secrets and log group creationHere’s an example of what you don’t want… It’s easy to end up with blanket stuff like this, especially if trying to combine task-specific permissions with things needed by console users. This would be great for the latter, but is far too wide for task instances (one service could easily discover and enumerate all secrets):
Be careful in access granted to tasks!Managing Secrets One topic most real-world apps will encounter that deserves a section of its own is secrets management. At some point you are almost certainly going to need to inject sensitive information into your container… perhaps a database password, session secret or API keys.
AWS offers (at least?) two ways to get your custom values into ECS-hosted containers securely. You can use Secrets Manager or Parameter Store. These offer benefits similar to HashiCorp’s Vault, but avoid one more thing to manage. They provide UI, CLI and API methods to manage secrets, securely encrypt anything you store, and can leverage IAM to restrict access
Both Secrets Manager and Parameter Store work equally well with ECS. There are some differences, however, including cost. Secrets Manager is better integrated with services like RDS, and supports automated rotation of secrets. Parameter store is integrated with services including ECS and Lambda, but does not support automated rotation out of the box and is cheaper to use.
At the time of writing Secrets Manager costs $0.40 / secret / month while Parameter Store is only $0.05 / secret / month. If you are managing a lot of secrets and don’t require automated rotation, Parameter Store might make more sense.
For our simple app, we’re just injecting non-sensitive environment variables at run-time. We don’t have any secrets, so can avoid extra cost and accomplish everything we need with our Task Definition’s environment.
For sake of example, let’s say we do have secrets to think about, but we’re not managing RDS passwords (or similar things better integrated with Secrets Manager), and don’t require rotation… at least not automated (we could always rotate our own secrets manually if needed). We could use a combination of environment (for non-sensitive things) and secrets (providing ARNs to retrieve from Parameter Store) to get the job done:
{
  "containerDefinitions": [
    "environment": [
      {
        "name": "LISTEN_HOST",
        "value": "0.0.0.0"
      },
      {
        "name": "LISTEN_PORT",
        "value": "8080"
      },
      {
        "name": "NODE_ENV",
        "value": "production"
      }
    ],
    "secrets": [
      {
        {
          "name": "SESSION_SECRET",
          "valueFrom": "arn:aws:ssm:us-east-2:012345678901:parameter/hello-world/SESSION_SECRET"
        }
    ]
  ]
}
Closing Thoughts
We’ve found lots of good references to help make sense of the JSON blobs that are AWS ECS Task Definitions, and learned some nuance about a few of the more interesting parameters… Still, real-world examples are nice. Be sure to refer to the sample included in our project repo to see how everything ties together.
So far in this series we’ve focussed on first principles… Understanding the AWS services we need to get our job done, including CLI commands with minimal shell wrappers to reduce some toil. However, even if we were building from the ground up with an IaC tool such as Terraform [https://www.terraform.io], we would still need to understand and define Task Definitions (Terraform just leverages our JSON file). Any investment in understanding how task definitions work will continue to be useful as you move to more advanced deployment automation.
With a Dockerized app pushed to ECR and a Task Definition describing what we want to deploy, we’re ready to tackle the last bits of ECS… Defining a cluster (to host our service) and service (to manage our tasks). In the next part of this series we’ll walk through that using the web console. We’ll also look at how we push updates, whether changes in our Task Definition or code.
As a final peek at the future… Once we have a fully functional app hosted on ECS and understand basic lifecycle management, we’ll re-visit the CLI and UI tasks we’ve used and automate those with Terraform [https://www.terraform.io].
References